Posted: Mon Jan 14, 2008 11:51 am Post subject: 7 Steps For ALE Configuration
Notes: 105 is Sender and 800 Receiver System For Example 1. Create Users for ALE transfer in both receiving and sending client/systems.
Create users in both the client/systems giving the same user name and proper authorizations. We need to use these user ids to logon through the remote connection and perform the IDOC transfers.
2. Creating Logical Systems
- Create logical systems for both sending and receiving systems in both systems.
- Login to Client 105 (SENDER)
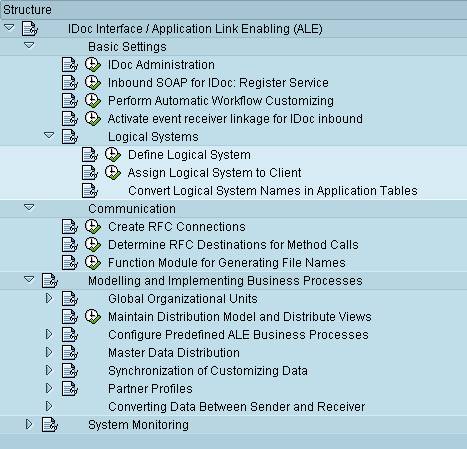
- Go to T. Code SALE
- Expand Sending and Receiving Systems
- Expand Logical Systems
- Click on Define Logical System
- Click on New Entries
- Create Logical Systems with naming convention 'system name'+'CLNT'+client no . For example for sending system ex: SSPCLNT105
- Create Logical Systems with naming convention 'system name'+'CLNT'+client no ex: example for receiving system ex SEDCLNT800
- Save and come back
- Click on Assign client 105 to Logical system SSPCLNT105
- Now, logon to client 800, repeat the same above process to create logical systems SEDCLNT800 and SSPCLNT105
- Save and come back
- Click on Assign client 800 to Logical system SEDCLNT800
3. Creating the RFCs
- In client 105, Go to T. Code SM59
- Expand R/3 Connections
- Enter RFC Name as SSPCLNT105 (give this name same as that of logical name created in step1 so that the ports are automatically created)
- Connection Type as 3
- Language as EN
- Give the logon details for client 800 (usually, we create a new user with proper authorizations for this ALE data transfer)
- Click on Remote logon button to test the RFC
- Now, go to client 800 and repeat the same process to create the RFC connection to client 105, giving logon credentials to client 105
4. Creating Customer Distribution Model(we usually create this in the original system(sending system) and then distribute it to other systems. The actual creation of the model requests that you mention a technical name for the model (unique identifier in the systems landscape), a sender system, a receiver system and message types to exchange between those systems.)
- In Client 105, Go to T. Code BD64
- Click on change and Create model view button
- Enter the short text and Technical name as ZSSP_SED
- Select the model and click on Add Message Type Button,
- Give the Sender as SSPCLNT105, Receiver as SEDCLNT800,
- Give Message type as required, Ex: 'HRMD_A' for HR Module.(usually Message types given by SAP are available for a particular module, see this using tcode WE81, if not create a message type first)
- Note: If we are performing this data transfer task for all modules at a Customer site, then we will need to use the appropriate message type and create a new Distribution model.
- Select the above model view & click on Environment -> Generate Partner Profiles
- Select Transfer IDOC Immediately and Trigger Immediately radio buttons
- Click on Execute
- You should get a list in green color which means it executed successfully.
- Back to main screen, select the model view
- Click Edit->Model view->Distribute
- Click on continue
- You should get a list saying model view is distributed successfully.
5. Checking the Port
- In client 105, Go to T. Code WE21
- Expand Transactional RFC
- Find the port from the list which is created using BD64 for SEDCLNT800 (Receiving system) RFC Destination.
6. Checking the Partner Profiles.
- In client 105, Go to T. Code WE20
- Expand Partner Type LS
- Select the Partner profile SEDCLNT800
- Double click on Message Type (For Ex: In HR Module, HRMD_A in Outbound parameters.)
- Check Receiver Port is assigned correctly
- Check the Basic type as your Basic IDOC object.
- In the sending system, select the option to transfer IDOCs immediately.
- By default, in the receiving system IDOCS are bunched together and received.
7. Creating the Message Type
- Message type defines the 'meaning' of data. It is just a logical entity that gets connected to the Idoc type (in tcode we82) or gets connected to the distribution model (in tcode BD64)
- If necessary create a new message type. In client 105, go to tcode we81.
- Click on change, continue
- Click on New Entries button
- Give message type in customer namespace Z* and description
- Save and back
You cannot post new topics in this forum You cannot reply to topics in this forum You cannot edit your posts in this forum You cannot delete your posts in this forum You cannot vote in polls in this forum You cannot attach files in this forum You can download files in this forum
All product names are trademarks of their respective companies. SAPNET.RU websites are in no way affiliated with SAP AG. SAP, SAP R/3, R/3 software, mySAP, ABAP, BAPI, xApps, SAP NetWeaver and any other are registered trademarks of SAP AG. Every effort is made to ensure content integrity. Use information on this site at your own risk.